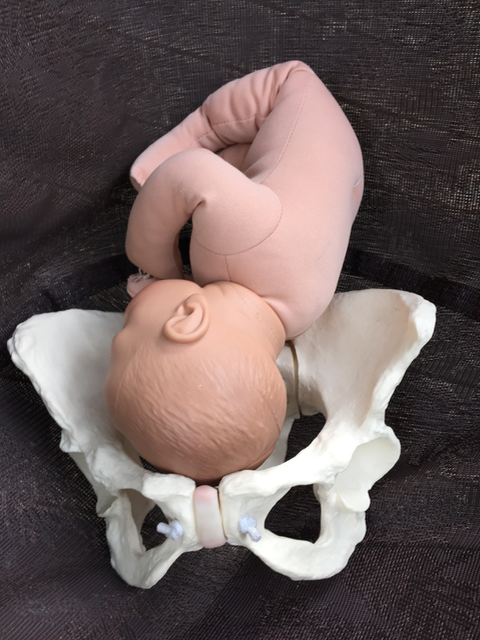
Picking birth positions is easier when you know which part of the pelvis to make bigger.
Where’s Baby Now?
The baby turns at three of the five levels of the pelvis to find the most room to come through the pelvis. The top, middle, and bottom of the pelvic tunnel each have their own shape where more room is available. Helping baby turn to where the most space is at each level is more important than issues of the size of the baby.
The levels of the pelvis roughly correspond to stations of the pelvis (Levels of Hodge in some countries).
Parents and providers can ask, “Where’s Baby?” to get an idea of how fetal rotation is going and what actions they might do to help optimize the birth anatomy at the location of the baby.
Gail Tully was the first to systemize body balancing and birth positions to match baby’s path through the pelvis. The Pelvic Levels SolutionsSM is Gail’s greatest contribution to the future of childbirth care practice. Before our attempts at birth positions were first, our favorites, and if that didn’t work, random and repetitive attempts to bring baby lower. Now we can intelligently apply a greater knowledge of physiological birth, and in so doing, do less.
Use the numbers below to help you understand the answer of the professional who gives an examination in labor.
- Inlet, -4, -3
- Midpelvis, 0 station, -1, +1, too
- Outlet, +2 or lower

The Pelvic Levels SolutionsSM
The spontaneous and instinctual movements and positions chosen by the person giving birth are respected first.
Birth instincts emerge naturally when the body and the environment are physiologically in sync. The Pelvic Levels SolutionsSM is Spinning Babies® pathway to understand baby’s cardinal movements, and to help restore physiology when labor is painful, long, or heading to an intervention due to a large number of complications.
The purpose of this knowledge is so parents and professionals are not inadvertently using inappropriate birth positions.
Parents, when you ask, “Where’s Baby?” you can also ask, “what pelvic station is the baby?”
Your provider may answer with the number of the pelvic station.
- Minus numbers (+4, +3, or +2) are high.
- 0 station is in the middle and usually where baby is when you start pushing.
- Plus numbers are low (+1 is still almost the middle but heading down, +2 is usually heard during pushing).
If you only hear, “baby is still high”, you know baby is at the inlet or -3. You can help baby engage in the pelvis yourself or have your provider help you with more complicated positions to open the top.
If you hear “baby is fully engaged”, you can assume baby is near 0 station (-1 or +1 station are close enough to count as 0 station) and do Side-lying Release (again) and then a lunge or what I call a bed lunge.
If you hear “baby is low”, “Push again and we might see the baby!” or “We see a little bit of the baby!” you can use activities to open the bottom of the pelvis, called the outlet.
Wait, There’s 5!
Providers who study birth will know there are actually five levels of the pelvis in full. Three are involved with fetal rotation, however, and that is the focus of this article.
- Station -2 can be considered it’s own level. Usually baby doesn’t delay here. When baby stays at -2 while the cervix continues to open over the hours, we teach a -2 solution in our 2-Day Workshop and Provider email series (and blog).
- Station +2 is considered a level on it’s own. Usually there is plenty of room here at +2. So when baby isn’t moving lower than +2 during pushing stage, we suggest sacral mobility techniques to resume labor progress and allow the pelvis to open for a vaginal birth.
To pick the best birth position, know where your baby is during the birthing process!
Whenever possible introduce techniques for balance with the Spinning Babies® Three Principles of Balance, Gravity, and Movement in labor. In this article we honor gravity but address diameters of the pelvis. Begin a systematic method for birth positioning when:
- Labor onset is delayed (learn not to shut the brim)
- Labor progress is delayed
- Pain is inhibiting confidence, movement or the intuition
- Along labor is not desired or the best for health
- The birthing person wants too, for instance, asks for help to have a vaginal birth
Inlet
The baby begins the journey through the pelvis by engaging in the brim or inlet of the pelvis.
At the inlet of the pelvis, the bones can be positioned to let baby in by tilting the pelvis so the bones are further apart to get out of baby’s way.
Helping a baby engage when not yet engaged at the start of labor is the most effective action to avoid an unnecessary cesarean.
Midwives, Doctors, and Nurses are impressed with the reduction in the start and stop labor pattern or the pain of a pre-labor attempt by the uterus to get baby into the pelvis.
Maternal Positioning in Birth
Spinning Babies® calls maternal positioning by a catchy name, Rest SmartSM.
Evidence shows that common maternal positioning, such as pelvic tilts or sitting upright are not likely to change a baby’s position. Changing position sometimes works, and is good to do for other reasons, however!
In the Spinning Babies® approach we add “body balance” first and then match the positions to where baby happens to be waiting. Uterine contractions can then change baby’s position.
Add balance, make room, get up and moving!
Start early and choose wisely for more success.
Birth Smart Positions to Make Room in the Top
- Posterior pelvic tilt
- Sitting with Knees apart, soles together and the back more straight than curled
- Abdominal Lift and Tuck
- One of the Walcher varieties
Instinctual movements are standing, walking, slow dancing, arms above the head or shoulders, and extending the back to lift the ribs off the abdomen.
Avoid closing the inlet until baby is low:
When baby is high, you may feel pressure on your pubic bone, hips or the middle of your back. You don’t feel a lot of pressure deep inside your pelvis on your cervix or anus yet. When labor is strong and challenging and you find out baby is high, use these positions and our other suggestions to help baby engage in labor.
Room at the inlet is reduced by curling around baby in pushing, slouching on the couch, and bringing the thighs close to the abdomen as in child’s pose or a low hands-and-knees position. Avoid squatting for the time being, because it will close the top of the pelvis.
When baby is high, don’t bother with lunges, squats, or walking the stairs or curb sideways for helping the labor progress.
What’s the cervix doing when baby is at the inlet?
The cervix is often 4 cm or less than 4 cm while the uterus tries to engage baby at -3 station. Cervical dilation doesn’t always correlate. The cervix can be 10 cm but the care provider finds that baby is remaining high even with the urge to push. Don’t bother pushing in positions that close the inlet (check the list above).
Ask “Where’s baby?” when body balancing or a few hours of regular contractions don’t engage baby. Once engaged, the pain from strong contractions is actually less. There is a potential for a rest which is not a problem with baby’s size. After a long labor to engage baby, the uterus gets to rest. It’s nature’s wisdom. Labor begins again within 12-24 hours. The ease of such a labor is quite improved!
Is baby stuck at -2?
The cervix dilates right on schedule (whose schedule?) but the baby doesn’t come down to 0 station at 5 cm or 7 cm… what’s going on? Baby is mis-engaged.
- Back baby up by jiggling the buttocks during Forward-leaning Release through 1-2 contractions
Ask “Where’s Baby?” rather than “how far dilated?” to match smart actions to the needs of labor.
Birth Positions When Baby is Engaged in the Midpelvis
The baby turns on the pelvic floor in the midpelvis. This is the narrow part of the pelvis and a baby can get stuck here if the baby can’t rotate on a tight or twisted pelvic floor. Pain increases beyond what would otherwise be necessary due to muscles being short and tight, not supple. The ischial spines could potentially be in the way, if prominent, holding the baby that continued facing the hip this far down in the pelvis from turning. The posterior baby may not have enough room to turn, but some room can be created. Will it be enough? It’s worth exploring! We have fantastic praise for midpelvis techniques.
Make room in the midpelvis with
- Side-lying Release
- Lunge to side with one foot squarely on a stool or chair (don’t let knee past toes)
- Arrange the thighs neutral or internally rotated
- Arrange the thighs internally rotated while on hands-and-knees, or standing
- Sacrotuberous release
Is it more a matter of flexion? Is baby’s head still posterior, asynclitic or transverse an hour after a Side-lying Release?
- Back baby up by jiggling the buttocks during Forward-leaning Release through 1-2 contractions
What’s the cervix doing when baby is in the midpelvis?
The cervix is often 5 cm or more while baby is in the midpelvis. Cervical dilation doesn’t always correlate. Ask “Where’s baby?” when body balancing or an hour of birth positions don’t make a significant increase in labor intensity or progress. Once baby rotates, the labor pain is actually less but the action is quite improved!
Birth Positions When Baby is in the Outlet
The baby is almost visible or visible when the widest part of the head is coming through the outlet. Once baby is visible, the head rocks out with the contraction and in to relieve the perineum and the pressure on the head, allow for this rocking motion without trying to keep the head showing between contractions. After crowning, the head will stay visible.
A baby is not likely to get stuck in the outlet of a mobile pelvis unless someone instructs the person to close the outlet by bringing the knees far apart during pushing!
It’s possible that the posterior or transverse baby waits to rotate on the perineum. This is because, for that baby, their head has to be lower than the bony pelvis to find room to rotate. Let the head show you how it turns by itself. The head will turn back so the chin is over baby’s own chest if allowed to turn on it’s own.
Pain increases beyond what would otherwise be necessary due to someone being made to stay on their back, push during the ring of fire just before the head emerges entirely, or even from the baby being physically held back (let’s stop this mistake).
The ischial tuberosities (sitz bones) could potentially be in the way, if narrow, holding the baby in. A if knees are apart, if the outlet is narrow, or the pelvis is not mobile. The posterior baby may not have enough room to descend.
Make room in the outlet
Reduce time, pain, or tearing
- Anterior pelvic tilt
- Knees together with feet apart (feet spread) heels out and toes turned in. Practice this a couple times now since there are three things to note in the correct position.
- Lunge to side in a kneeling position
- Lie on your side with knees close together and feet far apart turning the toes in (internal rotation of the femurs or thighs)
- Arrange the thighs internally rotated while on hands-and-knees, or standing
- Sacrotuberous release is crucial when baby remains at +2 and always helpful if there is a question of size
- Lay on your side or put a pillow under one buttocks if restrained to your back by your provider or circumstance
- Lay on your side with a peanut ball between ankles until head remains crowning between contractions, then move peanut ball and either remain on your side or if moving to your back, now, after crowning move slowly to back.
- Stand and hold someone or something higher than your belly, bend knees and stand on your heels with toes turned in
- Kneel on one knee with one foot on the floor or bed
- Squat with a lumbar curve, without leaning forward too much
- Before the head is visible, Side-lying Release for the S. I. joints early in 2nd stage to avoid tearing and pushing a long time
Is baby’s head still posterior an hour after a Side-lying Release?
- Use one of the above positions alternating with a flat lower back (posterior pelvic tilt) during a contraction
- Straight back, not curled around baby
What’s the cervix doing when baby is in the outlet?
The cervix is expected to be 10 cm while baby is moving through the outlet. Cervical dilation doesn’t always correlate.
Because at 10 cm the baby could still be above the inlet or could remain at the midpelvis and not move down until someone “opens the door” for them. See the portions above for solutions in those cases.
Help make room in the anatomy where baby waits whenever there is a delay in progress, pain that challenges, or a health reason to move labor along more steadily.
Where’s Baby in 2nd Stage?
The baby typically starts pushing stage at “0 station” (midpelvis). The baby moves lower than 0 station when pushing iss effective (+1, +2, +3 where baby becomes visible between contractions and +4 when crowning). The uterus moves the baby down through the second half of the pelvis in active second stage (some people do get a rest, called latent 2nd stage, at 10 cm).
Ask “Where’s baby?” when body balancing or a change to a new of birth position doesn’t allow a significant descent in baby’s location after 3 strong contractions or 6 mild contractions.
Instinctively, a position of choice is often to kneel on one knee with one foot on the floor. Semi-sitting or hands-and-knees in the birth tub is commonly seen. Standing is common, too
Will Birth Positioning Always Work?
Gail Tully’s Pelvic Levels SolutionsSM are the true hallmark of Spinning Babies®.
The response from parents and professionals have moved Spinning Babies® into the top tier of effective birth education programs and professional trainings. Hospitals use our Three Principles of Balance, Gravity, and MovementSM in Quality Improvement initiatives, to reduce primary cesarean rates, and to increase parent satisfaction with their birth services.
But in spite of the revolution in easier childbirth, our approach doesn’t always work. Some births will have factors that aren’t addressed by Spinning Babies® or can’t be addressed in the amount of time and selection of techniques needed to identify and address needs for the birth giver and baby. That is a fact.
We hope you find the level of use that satisfies your need to feel you have “done everything” short of suffering and harm. We don’t want suffering or harm. Our physiological approach is less supple when force is applied in methods of persuasion. This is a no-bully zone. We simply make room for baby and know we are validated when baby rotates and descends.
After using these techniques, a highly trained professional may try manual or technological interventions on a well-monitored motherbaby pair. Manual rotation of the posterior head, for example, is easier after a Side-lying Release. A cesarean may feel less unnecessary after both balancing and trying positions to make room for baby. These and other life-saving interventions are important tools in maternity care. We work together, beginning with the least intervention when health allows the time to be with the body to do the birth closest to nature. Let’s support nature. The more we know, the less we get in our own way.
To Summarize Pelvic Levels
The Pelvic Levels SolutionsSM open the pelvis by matching a smarter birth position where baby is passing through. Common birth positions are not always matched to the need of a particular birth. Instinctual movements and positions should be respected first but when labor is delayed, pain is inhibiting the intuition, or a long labor is not desired or the best for health, physiologic interventions can be used first to avoid or shorten the duration of technological or pharmaceutical interventions.
There are five levels of the pelvis. We address all five in our Spinning Babies® Integration Workshop and often in the two-day version of our foundational Spinning Babies® Workshop dehttps://www.spinningbabies.com/wp-content/uploads/2019/10/sample3-1.pngd under our Events link here on the website.
Start with body balancing first. Relieving patterns of tension or torsion in the muscles will reduce the force needed in either contractions or interventions. Please consider that helping the soft tissue pelvis to function will ease the following strategies. Sometimes changing birth positions hours after hours is no longer necessary because the soft tissue pelvis aligns with the bony pelvis and the uterus can then send baby forth.
After body balancing match the birth positions to the level of the pelvis that baby is going to move through next.
| Get the updated Quick Reference booklet or download. You can print your download and make cards on half sheets of paper. Choose your device carefully; the ebook will Download to One Device One Time only. https://www.spinningbabies.com/product/quick-reference-cards/ |
Knowing which positions open which part of the pelvis helps both parents and professionals create the most ease together by working with the baby and the body. Gravity helps, but we can’t expect every baby to squeeze through tight places made by our mistaken assumptions. Mismatching birth positions have, for practical purposes, closed the door on the waiting baby.
In labor, maternal positions are chosen for comfort by the person giving birth and suggested for progress and comfort by providers.
In Pregnancy, begin with the Spinning Babies® Three Principles, Balance, Gravity and MovementSM to optimize pregnancy health and baby’s position. Find ideas for body balancing in our pages on Daily Activities and Weekly Activities. Use Rest SmartSM to think about alignment for posture, and body balancing to allow better body function.
Sitting on the front of your sitz bones and not lounging back on the sacrum in a semi-sitting position makes the belly a hammock, as Midwife Jean Sutton dehttps://www.spinningbabies.com/wp-content/uploads/2019/10/sample3-1.pngs in Optimal Foetal Positioning.
In pregnancy, the assumption seems to be that maternal positioning with gravity is enough to reposition the baby also. When I didn’t see babies drop into place like marbles in a water balloon, questions began to arise, “How long does a fetal re-position take?” “Which position will rotate a posterior baby or flip a breech?” “Why didn’t baby’s position change when hands-and-knees or lying on the left side was being done consistently?” These questions drew me to body balancing and the multiple factors of fetal positioning.
At Spinning Babies® we believe we can make room for baby to turn and descend with more ease.
- Balance the muscles and ligaments (not too tight, not too loose, not too twisty)
- Gravity to draw baby into flexion and down the pelvis
- Movement for the pelvis
Addressing ligaments and the fascia (connective tissue) in pregnancy will help ease baby’s journey through the levels of the pelvis in labor. The actions of the contractions help baby get into position in a balanced uterus. Use our Spinning Babies® Principles Balance, Gravity, and Movement to enhance pregnancy comfort and potentially ease childbirth.
Think about it
If a birth position isn’t making a difference in the labor within 3-6 contractions, then consider the following:
- Body Balance first! A ligament or muscle may be tight or twisted
- The position is closing the space baby is trying to navigate
- The labor hasn’t started or is in a rest cycle
- Baby is seeking to rotate before descent and body balancing would help the strong contractions work better
- The labor has stalled for emotional protection, to wait for an important person to arrive, to arrive at the birth site
- The birthing person needs food, fluid, or electrolytes
- There is a natural pause between full dilation and spontaneous pushing for the ligaments to adjust and molding to occur
Current research validates some birth positions while showing other commonly recommended maternal positions don’t help the way midwives and doctors assumed. Avoid a cesarean for “failure to progress” with our “Pelvic Levels” perspective.
Resources
- The video download, Spinning Babies® Parent class which goes into the balancing techniques and the tips for labor – in depth! The 3 levels of the pelvis are well explained. You will learn a lot even as a provider from this “birth geek parent” video. This can be ordered as a DVD, too.
- The Quick Reference (digital download) reminds you of what you learned in our Spinning Babies® Workshop. The Quick Reference booklet can be sized to fit in a birth bag or added to a hospital or birth center’s reference library. Made for providers.
- The Spinning Babies® Badge Buddies.
- Spinning Babies® hosts online courses showing Pelvic Levels SolutionsSM for Resolving Shoulder Dystocia and Breech Basics. Continuing Education hours and credits for some birth professionals.
Want examples on this topic?
Solutions for Dystocia in the Levels of the Pelvis
Three Levels to avoiding a cesarean
Solutions for Dystocia in the Levels of the Pelvis